导语
本文主要是关于iOS11和iPhoneX上的适配问题。主要内容包括:大标题显示、SafeArea、adjustContentInset属性、UITableView的高度自动计算、iPhoneX机型适配、DeviceCheck新功能介绍.
大标题显示
在iOS11系统上UINavigationBar新增了一个prefersLargeTitles的BOOL值属性,将该值设为YES,导航栏就会呈现出大标题的效果,如果想要控制在不同页面大标题的显示,可以通过设置当前页面的navigationItem的largetTitleDisplayMode属性来个性化修改
1 | typedef NS_ENUM(NSInteger, UINavigationItemLargeTitleDisplayMode) { |
iOS11之前导航栏默认高度为64pt(这里高度指statusBar + NavigationBar),iOS11之后如果设置了prefersLargeTitles = YES则为96pt,默认情况下还是64pt,但在iPhoneX上由于刘海的出现statusBar由以前的20pt变成了44pt,所以iPhoneX上高度变为88pt,如果项目里隐藏了导航栏加了自定义按钮之类的,这里需要注意适配一下。
SafeArea
安全区域是iOS11新提出的布局概念,系统是根据安全区域来自动调整scrollView的内容偏移量。示意图如下:
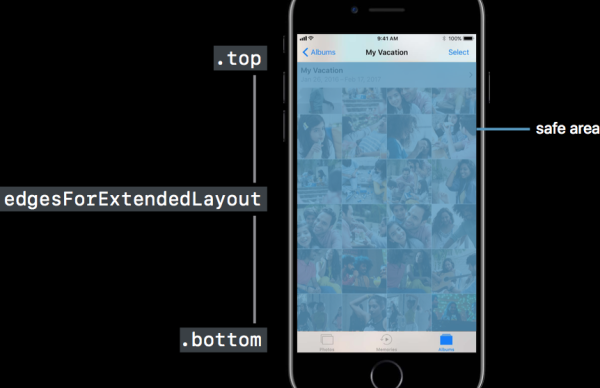
安全区域帮助我们将view放置在整个屏幕的可视的部分。即使把navigationbar设置为透明的,系统也认为安全区域是从navigationbar的bottom开始,保证不被系统的状态栏、或导航栏覆盖。可以使用additionalSafeAreaInsets去扩展安全区域使它包括自定义的content在界面上。每个view都可以改变安全区域嵌入的大小,Controller也可以。
safeAreaInsets属性反映了一个view距离该view的安全区域的边距。对于一个Controller的根视图而言,SafeAreaInsets值包括了被statusbar和其他可视的bars覆盖的区域和其他通过additionalSafeAreaInsets自定义的insets值。如果一个view全部在它父视图的安全区域内,则SafeAreaInsets值为(0,0,0,0)。
UIScrollView的adjustContentInset属性
Web页在升级到iOS11系统后发现scrollView内容下移了20pt
原因分析
iOS7系统之后可以通过设置UIViewController的automaticallyAdjustsScrollViewInsets(默认为YES)为NO来禁止系统自动调整UIScrollView的contentInset,但在iOS11中系统废弃了该属性,改为使用contentInsetAdjustmentBehavior和adjustedContentInset。在iOS11中是用来决定scrollView的内容与边缘距离的属性是adjustedContentInset而不是contentInset。当scrollView超出安全区域时系统会自动调整SafeAreaInsets值,进而影响adjustedContentInset,所以导致scrollView下移了20pt或者64pt。当使用自定义的navigationbar,并且scrollView的frame超出安全区域,SafeAreaInsets为(20,0,0,0);当使用系统的navigationbar,SafeAreaInsets为(64,0,0,0)。
adjustContentInset计算方式
adjustContentInset属性定义如下:
1 | /* Configure the behavior of adjustedContentInset. |
contentInsetAdjustmentBehavior属性定义如下:
1 | typedef NS_ENUM(NSInteger, UIScrollViewContentInsetAdjustmentBehavior) { |
adjustContentInset表示contentView.frame.origin偏移了scrollview.frame.origin多少;是系统计算得来的,计算方式由contentInsetAdjustmentBehavior决定。有以下几种计算方式:
UIScrollViewContentInsetAdjustmentAutomatic:如果scrollview在一个automaticallyAdjustsScrollViewContentInset = YES的controller上,并且这个Controller包含在一个navigation controller中,这种情况下会设置在top & bottom上 adjustedContentInset = safeAreaInset + contentInset不管是否滚动。其他情况下与UIScrollViewContentInsetAdjustmentScrollableAxes相同UIScrollViewContentInsetAdjustmentScrollableAxes: 在可滚动方向上adjustedContentInset = safeAreaInset + contentInset,在不可滚动方向上adjustedContentInset = contentInset;依赖于scrollEnabled和alwaysBounceHorizontal / vertical = YES,scrollEnabled默认为yes,所以大多数情况下,计算方式还是adjustedContentInset = safeAreaInset + contentInsetUIScrollViewContentInsetAdjustmentNever: adjustedContentInset = contentInsetUIScrollViewContentInsetAdjustmentAlways: adjustedContentInset = safeAreaInset + contentInset
当contentInsetAdjustmentBehavior设置为UIScrollViewContentInsetAdjustmentNever的时候,adjustContentInset值不受SafeAreaInset值的影响。
解决代码如下:
1 | //适配iOS11系统,解决Web页向下挪移20像素问题 |
UITableView的Self-Sizing
在iOS11中UITableView会默认使用Self-Sizing,这会导致tableView的estimatedRowHeight、estimatedSectionHeaderHeight、estimatedSectionFooterHeight的高度估算属性由默认的0变成了UITableViewAutomaticDimension,reloadData时可能会导致最后显示的contentSize与预想的不一致;同时在iOS11中如果不实现-tableView: viewForHeaderInSection:和tableView: viewForFooterInSection:方法,则-tableView: heightForHeaderInSection:和- tableView: heightForFooterInSection:不会被调用,iOS11之前则没问题。上述都可能会导致界面出现错乱。
解决方法是手动将tableView的估算行高关闭,代码如下:
1 | _tbView.estimatedRowHeight = 0; |
iPhoneX适配
目前项目运行在iPhone X模拟器上会在上下显示黑边,未撑满全屏。原因是因为iPhoneX的屏幕分辨率为1125 x 2436,LaunchImage中未含有该分辨率的图片导致。
解决方法一:在LaunchImage中增加一个1125 x 2436分辨率的iPhoneX启动图
解决方法二:使用iOS11的SDK编译项目,将LaunchScreen.storyboard作为启动File,系统会自动启用fullscreen native resolution效果。
新的设备名称:
@”iPhone10,1” : @”iPhone 8”,
@”iPhone10,4” : @”iPhone 8”,
@”iPhone10,2” : @”iPhone 8 Plus”,
@”iPhone10,5” : @”iPhone 8 Plus”,
@”iPhone10,3” : @”iPhone X”,
@”iPhone10,6” : @”iPhone X”,
代码获取设备名称:
1 | struct utsname systemInfo; |
DeviceCheck
DeviceCheck 允许你通过你的服务器与 Apple 服务器通讯,并为单个设备设置两个 bit 的数据。简单说,你在设备上用 DeviceCheck API 生成一个 token,然后将这个 token 发给自己的服务器,再由自己的服务器与 Apple 的 API 进行通讯,来更新或者查询该设备的值。这两个 bit 的数据用来追踪用户,比起用广告ID追踪用户是个更好的选择。该API可以用于反欺诈领域,比如滴滴司机被封号后,防止重新注册账号接单;是否已经领取过红包奖励等。
因为传输的是 flag 级别的数据,并不会定位到该设备的使用者,所以相对安全。
但是对于购买了二手手机的使用场景,可能会出现一些边界情况,这个在业务中也需要考虑进去。
示例代码:
1 | if (DCDevice.currentDevice.isSupported) { |
定位弹窗
在iOS11模拟器上定位弹窗不会主动弹出,是因为原有的NSLocationAlwaysUsageDescription被降级为NSLocationWhenInUseUsageDescription。因此,在原来项目中使用requestAlwaysAuthorization获取定位权限,而未在plist文件中配置NSLocationAlwaysAndWhenInUseUsageDescription,系统框不会弹出。
解决办法为在Info.plist加上新的描述key值,如下所示:
1 | <key>NSLocationAlwaysAndWhenInUseUsageDescription</key> |
相册权限
在iOS11上需要添加新的权限定义
1 | <key>NSPhotoLibraryAddUsageDescription</key> |
参考资料:
若你觉得我的文章对你有帮助,欢迎点击上方按钮对我打赏
扫描二维码,分享此文章